Ever have the feeling that you’re not taking full advantage of something? For example, the dessert section at a buffet restaurant. It’s tough to drool over the homemade strawberry pie after stuffing yourself with the mashed potatoes and meatloaf. We’ve had some customers in a similar situation, where they’ve purchased personalized yearbook pages, but have only utilized the first page. In an effort to help you take full advantage of personalized yearbook pages, we’ve put together this helpful step-by-step guide.
1. Select The Design You Want
With nine different layouts for you to choose from, there’s one that will speak to you. Whether it is remembering your family vacation or just celebrating another successful school year, we have no doubt that you’ll have one of the designs jump out at you.
2. Personalize Your Yearbook
Drop-in images you have on your computer or connect with Facebook and browse all those selfies. Whatever pictures you want to show-off can be inserted and displayed. A special thank you to our buddy Gus for being the model in this guide.
3. Perfect Your Pictures
Center those pictures so they’re perfectly displayed!
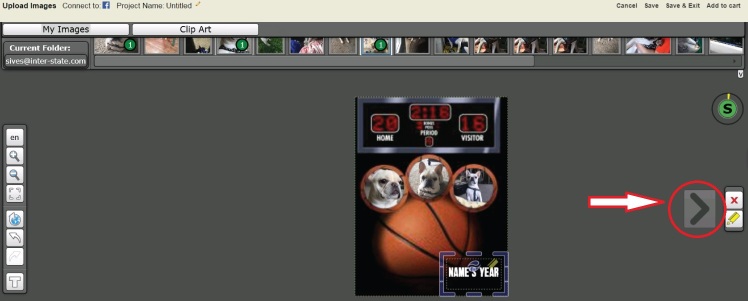
4. Click On The Arrow To Move To The Next Page
This is where some customers have been leaving options on the table. Click the arrow to advance to the next page in your yearbook; much like you would when browsing through a Facebook pictures album.
5. Complete Your Design
Mix and match your pictures to give your yearbook pages that one-of-a-kind design!
6. Purchase Your Personalized Yearbook Page
Complete your order process and then wait for your order to be shipped! Don’t forget to use the code “CUSTOM” at checkout to save 25% on your order.
That’s all there is to it. Granted, personalized yearbook pages aren’t nearly as delicious as strawberry pie. However, it’ll last much longer and preserve those special memories you’ll always treasure. Get started on your design today!

